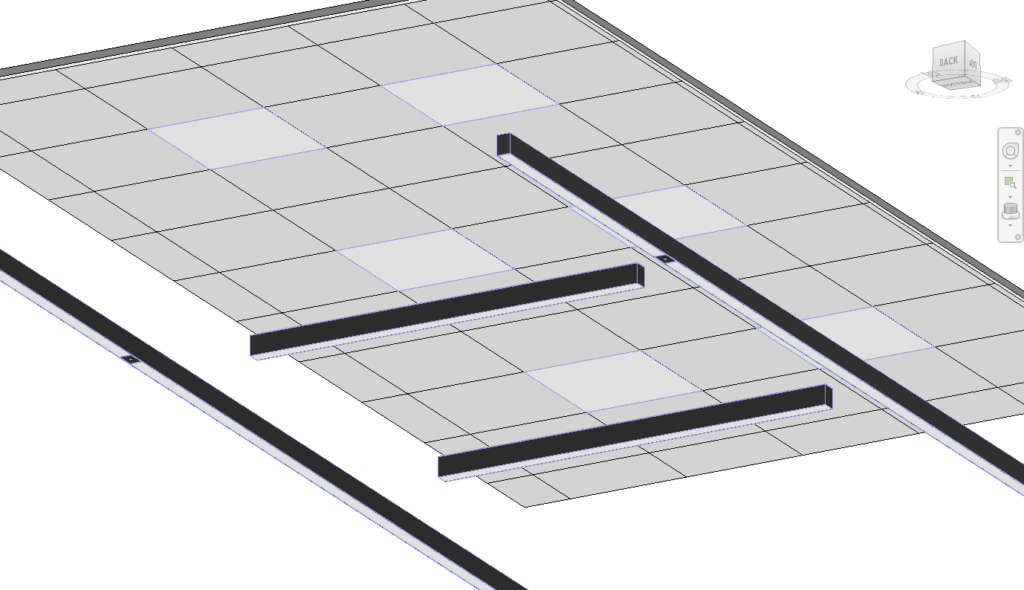
The PD_LTF Rectangular Luminaire Family is a powerful, fully parametric Revit family that allows users to create limitless lighting fixture configurations, all at LOD 400. Whether you’re designing linear luminaires, surface-mounted lights, recessed fixtures, or suspended fittings with up/down lighting, this family offers unmatched customization and reporting.
In this guide, we’ll walk through:
The PD_LTF Rectangular Luminaire is a complete redesign of its predecessor, incorporating:
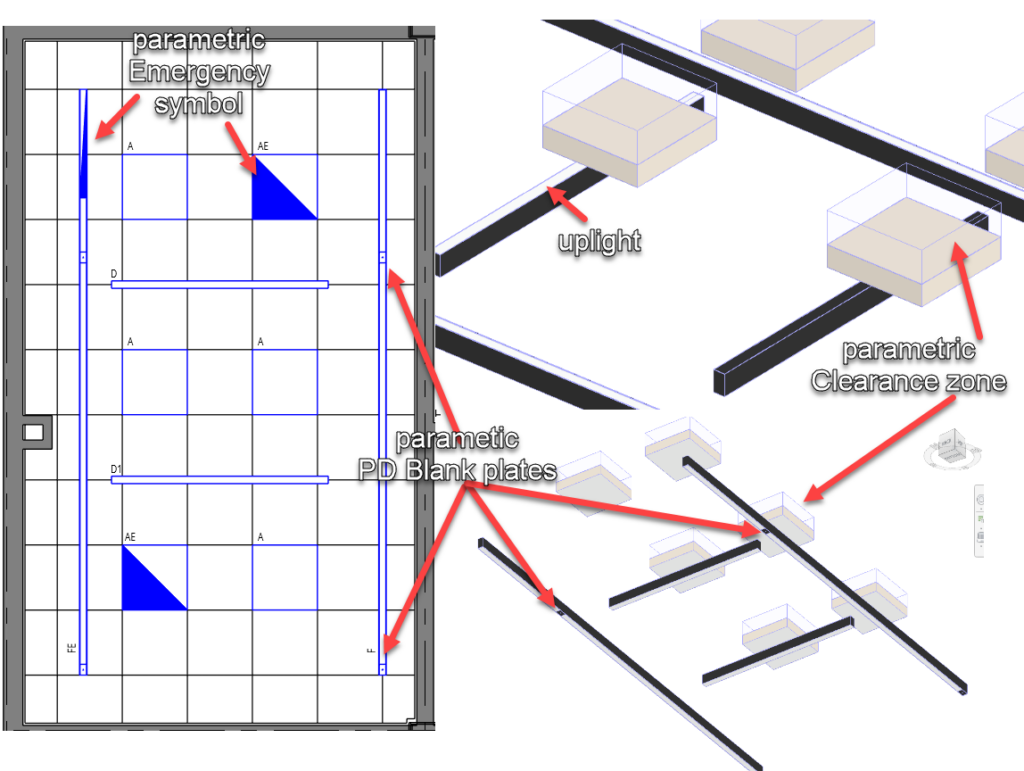
✅ Emergency Symbol Enhancements:
✅ Blank Plates for Linear Lights:
✅ Advanced Height Control & Reporting:
✅ Robust Error Prevention & Auto-Adjustments:
✅ Flexible Installation Options:
✅ Enhanced Data & Labels for Coordination:
Overall Dimensions:
PD_DIM_AssetLenght1PD_DIM_AssetWidth1PD_DIM_AssetHeight1Trim Adjustments (for recessed fittings):
PD_DIM_Trim1 (Left)PD_DIM_Trim2 (Right)PD_DIM_Trim3 (Top)PD_DIM_Trim4 (Bottom)The Emergency Symbol in this luminaire family is fully parametric, allowing precise placement and scaling to match your project’s requirements. This section explains how to enable, position, and resize the emergency symbol effectively.
✅ PD_DATe_IsEmergency = Yes (This makes the emergency symbol visible in the model.)
✅ Use PD_EMG_Symbol_position to place it anywhere along the luminaire.
✅ Use PD_EMG_Symbol_lenght to match the luminaire size or set length as per manufacturer if it’s linear fitting.
The emergency symbol’s position is controlled by PD_EMG_Symbol_position, which determines its horizontal placement along the luminaire’s length.
Default Position:
Custom Positioning:
PD_EMG_Symbol_position.There are two emergency symbols in this family, one is nested within family and it sis separately controlled.
The second symbol is used only if PD_DIM_Rotate_X = 90
The family calculates the symbol’s actual position using two offset parameters:
PD_DIM_SymbolOffsetRight
PD_DIM_SymbolOffsetLeft.
Formula for Automatic Symbol Offsets:
PD_DIM_SymbolOffsetRight
if(PD_EMG_Symbol_position > PD_DIM_AssetLenght1 / 2, PD_EMG_Symbol_position - PD_DIM_AssetLenght1 / 2, 0 mm)
PD_DIM_SymbolOffsetLeft
if(PD_EMG_Symbol_position < PD_DIM_AssetLenght1 / 2, PD_DIM_AssetLenght1 / 2 - PD_EMG_Symbol_position, 0 mm)
The width of the emergency symbol is auto-adjusted, but users must manually set the PD_EMG_Symbol_length parameter.
Default width Auto-Sizing:
The symbol scales dynamically based on the luminaire width using the PD_DIM_AssetWidth1 parameter.
Manual Lenght adjustment:
Whe ne creating new type user must set specific symbol size, simply enter a custom value into PD_EMG_Symbol_length.
This value should match manufacturer guidelines.
To add blank plates (used for Presence Detectors or other devices):
Enable Blanks
Use PD_Blank_QTY to specify how many blank plates are needed (max: 2).
Positioning the Blanks
Adjust PD_BlankPosition1 and PD_BlankPosition2.
Resizing the Blanks
Set PD_Blank_Lenght as per manufacturer specification
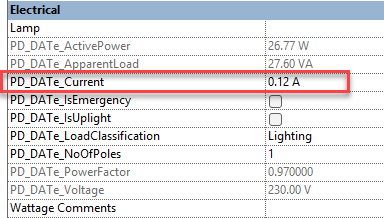
This family includes fully parametric electrical parameters to ensure correct load calculations.
The only input required to set up the load is the PD_Date_Current parameter
Recessed / Surface-Mounted: To adjust the mounting use the PD_DIM_AssetHeight_Offset parameter. Enter ‘zero’ for surface-mounted lights and for recessed lighting type values, which are the same as the depth of the luminaire but negative. If you want the fitting to protrude slightly below the ceiling, use value at least 1 mm less than the fitting depth
Suspended: Enable PD_DATe_IsUplight for uplighting.
Wall-Mounted: Set PD_DIM_Rotate_X to 90°.
Dont worry about View Region Adjustments:
Instead Enable PD_DAT_ExtendToCeiling1 or PD_DAT_ExtendToFloor1.
However, first set the correct ceiling height using parameter PD_DIM_CeilingHeight1 – this is project and/or room-specific, typically set from FFL to concrete ceiling slab, alternatively to the suspended ceiling height
Control Clearance Zones for Clash Detection:
Toggle PD_DAT_IsClearanceVisible1.
Set clearance height using PD_DIM_ClearanceHeight1 parameter
Each luminaire in the family includes a customisable label that provides essential data such as mounting height, type, sub-type, and rating. These labels can be turned on/off and adjusted in position for optimal readability in your Revit views.
| Parameter | Function |
|---|---|
PD_DAT_IsNoteHeight1 | Shows or hides the mounting height label. |
PD_DAT_IsNoteRating | Displays the power rating (e.g., 20W). |
PD_DAT_IsNoteType | Toggles visibility of the type label (e.g., “AE”). |
PD_DAT_UseType | Main label parameter, always used. Default example: "AE" |
PD_DAT_SubType | Adds additional categorization if needed. |
To ensure proper alignment, you can control the label position using:
PD_DIM_OffsetSymbol-X → Moves the label left/right
PD_DIM_OffsetSymbol-Y → Moves the label up/down
These parameters help in fine-tuning the placement.
This family includes COBie data, which is essential for compliance. All parameters have been provided, ready to be populated by the user
The PD_LTF Rectangular Luminaire Family is a versatile, highly parametric lighting solution that simplifies project workflows. By leveraging its customizable trims, emergency symbols, blank plates, and electrical properties, you can configure any type of light fitting with precision.
🔗 Download the latest version here: Project Design (IO) Ltd
Want to see a video tutorial? Let us know in the comments! 👇