On this page:

    COBie data drop

    Individual COBie data drops are the responsibility of Task Team BIM Managers, who must upload the required information containers in accordance with Exchange Information Requirements (EIR).
    The COBie data drop workflow illustrated here is for data drop from an Electrical model using the Autodesk COBie Extension For Revit, which is part of the Autodesk BIM Interoperability Tool (Autodesk, n.d.)

    Revit Family setup

    Before you can continue setting up your project, all Revit families must have their COBie parameters configured. If you are developing a model that was inherited from a consultant, there is the possibility of a few issues; here are a couple that we frequently encounter:

    • Family parameters exist but are locked by formula.
    • Incorrect classification of a parameter in the family, i.e. type parameter saved as instance or vice versa.

    This part of project setup is likely the most time-consuming; therefore, it is a good idea to begin the project using your own project template and family members, as it can save countless hours of labour.

    This section provides only a high-level overview of how to set up a family.
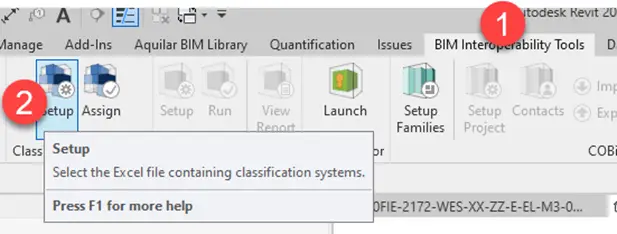
    Open Revit Family, and Go to > BIM Interoperability Tools >Setup
    Revit BIM Interoperability Tools ribbon tab with the Classification Manager Setup button and its tooltip
    BIM Interoperability Tools - Setup
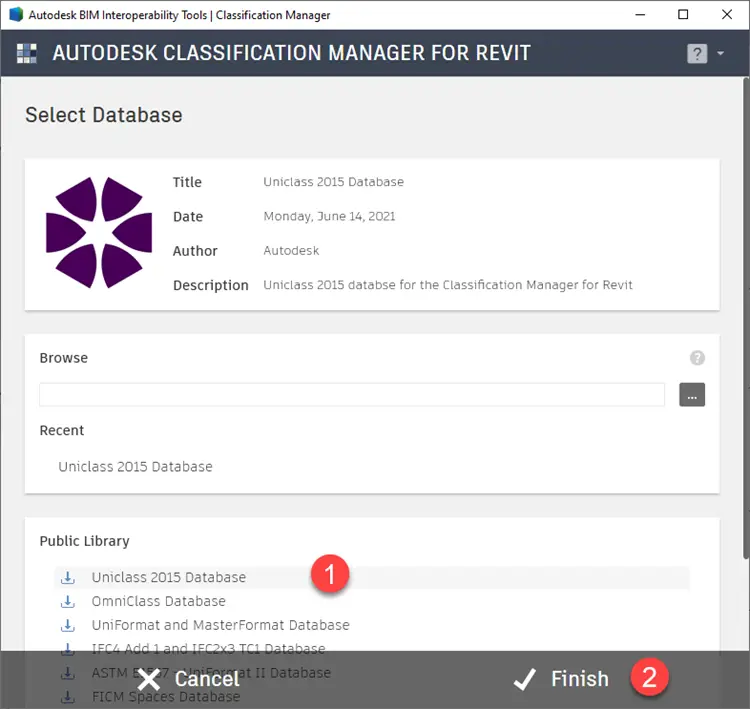
    After you click ‘setup’ select Uniclass 2015 Database and press finish
    Autodesk Classification Manager for Revit Select Database dialog with the Uniclass 2015 Database chosen
    Assign classification system > Select Database

    Assign Classification

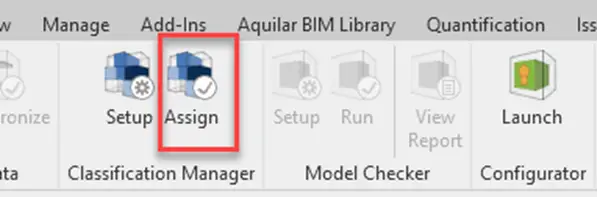
    Go to > Assign
    Revit Classification Manager panel with the Assign button highlighted
    Assign Classification

    Select Uniclass Pr Table and either search (step 2) or select a suitable code
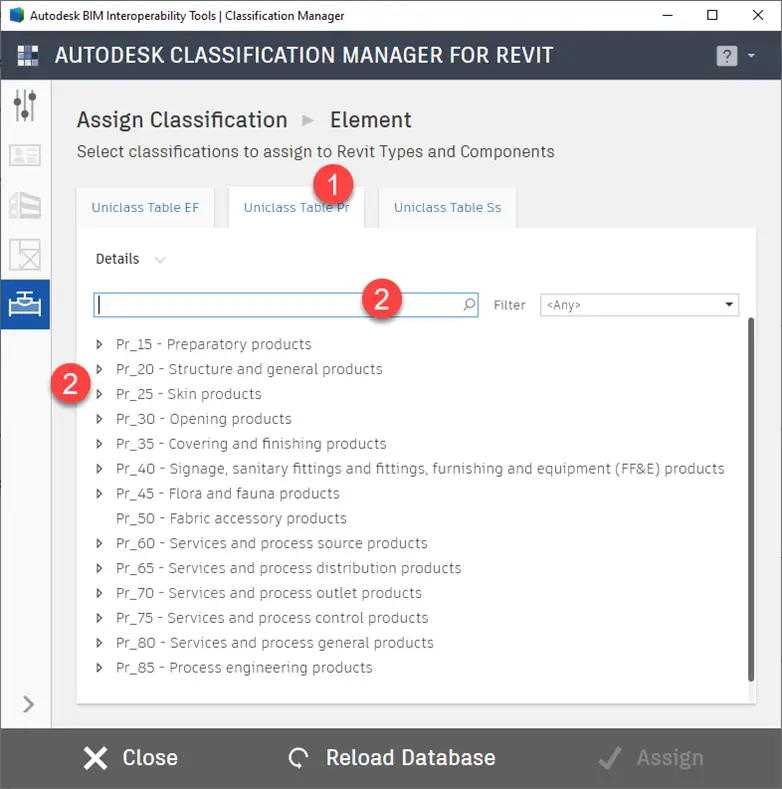
    Classification Manager Assign Classification dialog on the Uniclass Table Pr tab listing product groups Pr_15 to Pr_85
    Select Uniclass Pr Table

    Once suitable code has been found, select the code > click Assign > click > Close
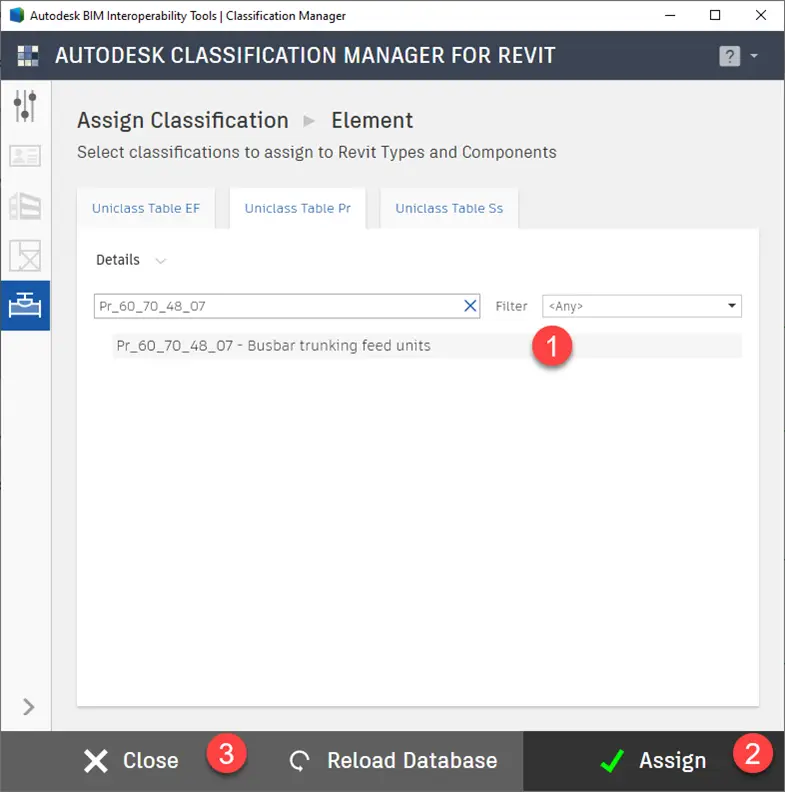
    Classification Manager Assign Classification dialog with Pr_60_70_48_07 Busbar trunking feed units selected
    Assign Classification > Element

    Set up Families

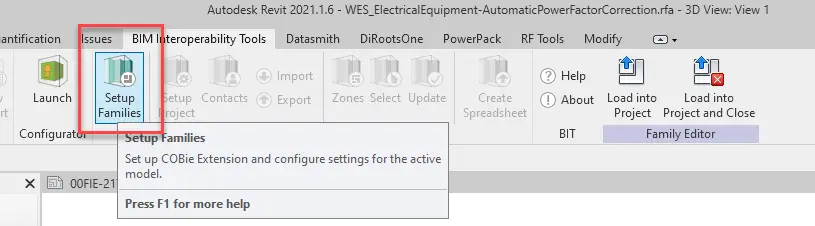
    Go to > BIM Interoperability Tools > Setup Families
    Revit BIM Interoperability Tools ribbon with the COBie Extension Setup Families button highlighted and its tooltip
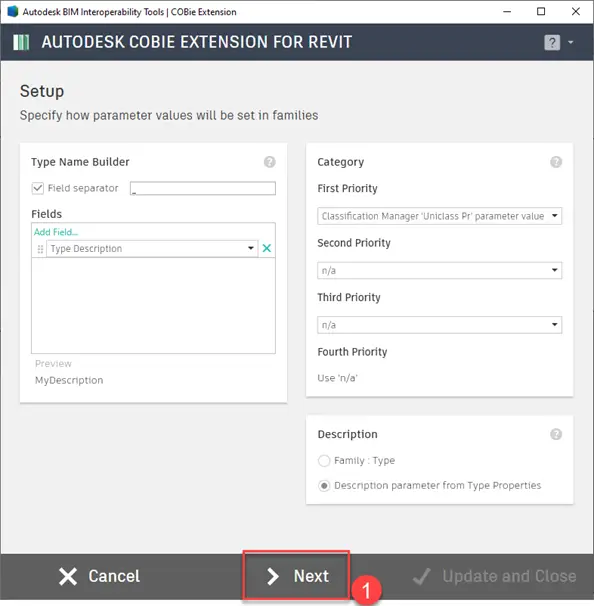
    Select all parameters as shown > click Next
    Autodesk COBie Extension for Revit family Setup page with type name builder and Uniclass Pr category priority
    BIM Interoperability Tools > Setup Family Parameters
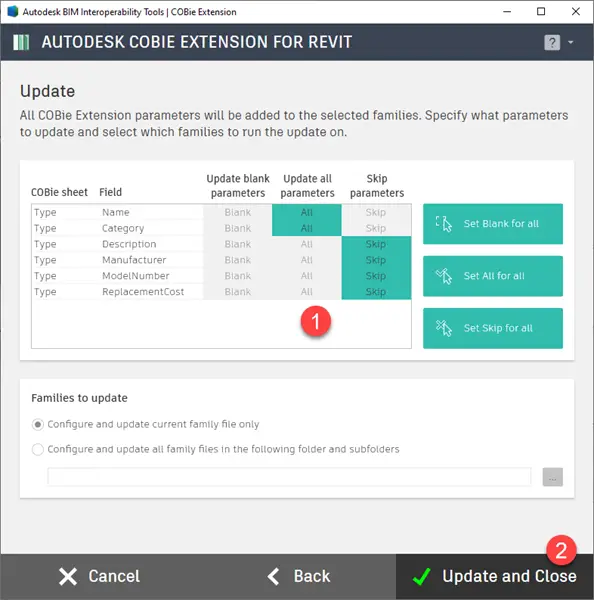
    Next, set the parameters as shown below and press > Update and Close
    COBie Extension Update page setting which type parameters to update or skip, with Update and Close highlighted
    Setup Families >Parameter Update
    Set the parameters as shown and press > Update and Close

    Custom Parameters

    The Exchange Information Requirements (EIR) may specify additional custom parameters that must be included in your COBie schema (exported to the spreadsheet), or you may want to combine one or more parameters to provide the required custom name. The combined parameters will have no effect on your Revit families or project; the result will be visible only in the COBie spreadsheet.

    > jump to parameter mapping

    This section demonstrates how to add two shared custom parameters: COBie.Type.NRM1 and COBie.Type.SFG20. The example demonstrates an unusual request to create two ‘type’ parameters, which are actually ‘instance’ parameters. These two ‘instance’ parameters will then be imported into the Facility Management (FM) system of the Appointing Party.
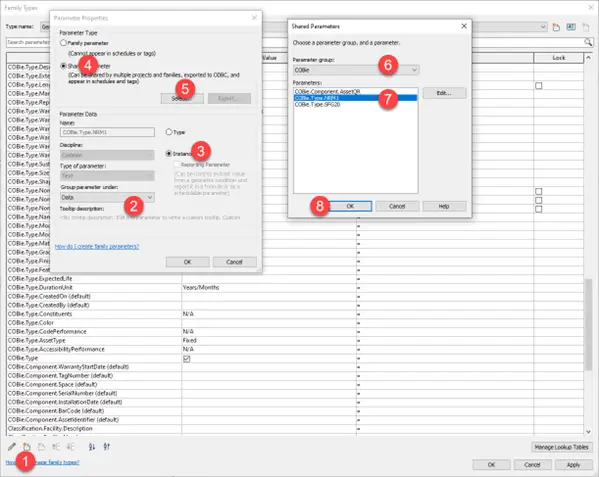
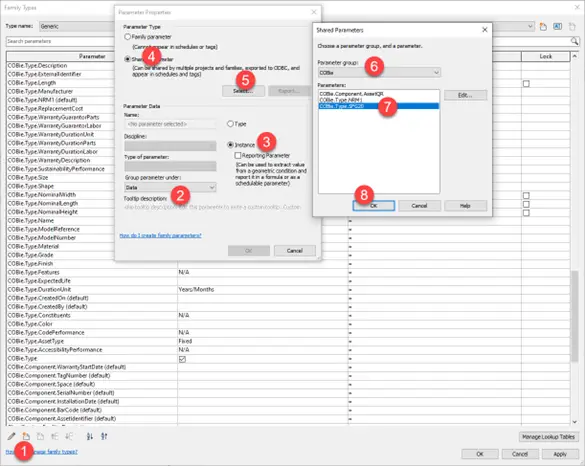
    First add the COBie.Type.NRM1 (default) – note it must be set as ‘instance parameter’ Follow the steps shown
    Revit Family Types and Shared Parameters dialogs adding the COBie.Type.NRM1 shared parameter in eight numbered steps
    COBie.Type.NRM1 (default)
    Repeat the same process as shown in Figure 5 and set the parameter: COBie.Type.SFG20 (default) This is also to be set as ‘instance’ parameter
    Revit Family Types and Shared Parameters dialogs adding the COBie.Type.SFG20 shared parameter in eight numbered steps
    COBie.Type.SFG20 (default)

    Project Set-Up

    The project must be set up in order to export COBie data into an excel spreadsheet.

    Revit BIM Interoperability Tools ribbon with the COBie Extension Setup Project button highlighted
    BIM Interoperability Tools_Setup Project
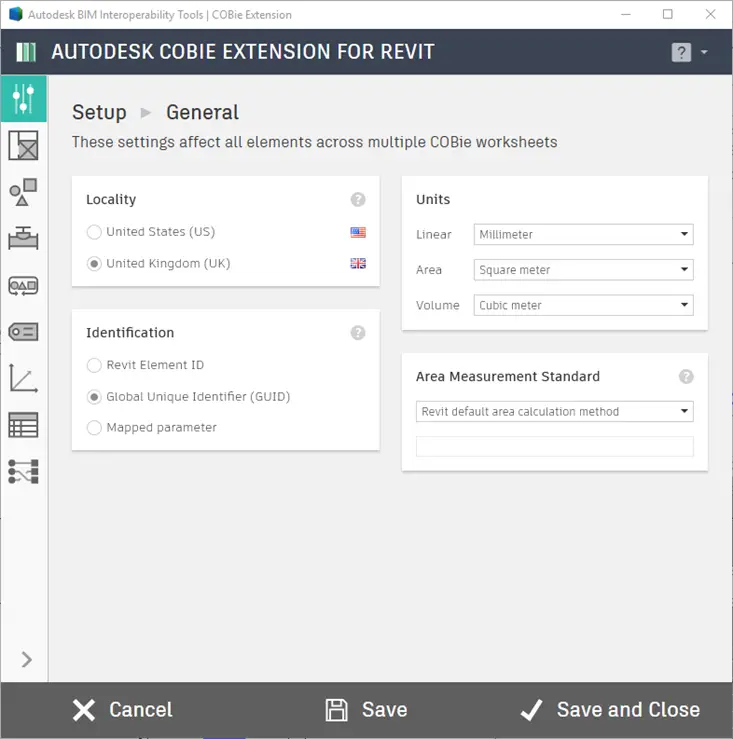
    Setup > General
    COBie Extension Setup General page with United Kingdom locality, GUID identification and metric units
    BIM Interoperability Tools > Setup Project >General
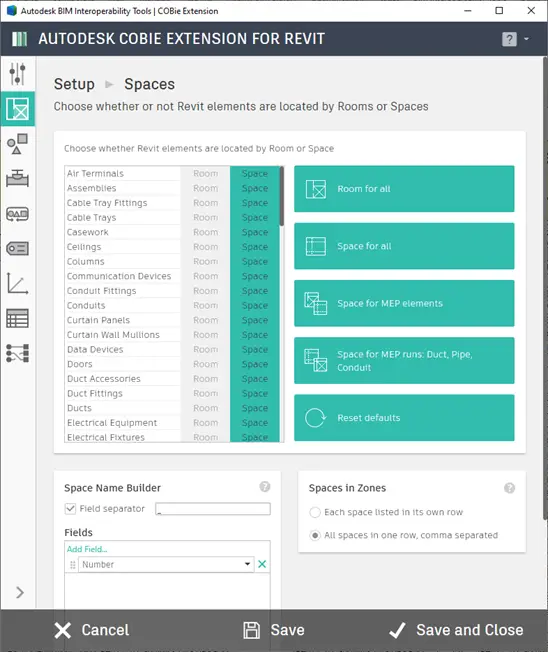
    Setup > Space
    Autodesk COBie Extension for Revit Setup Spaces screen, choosing whether elements are located by room or space
    BIM Interoperability Tools > Setup Project_Systems
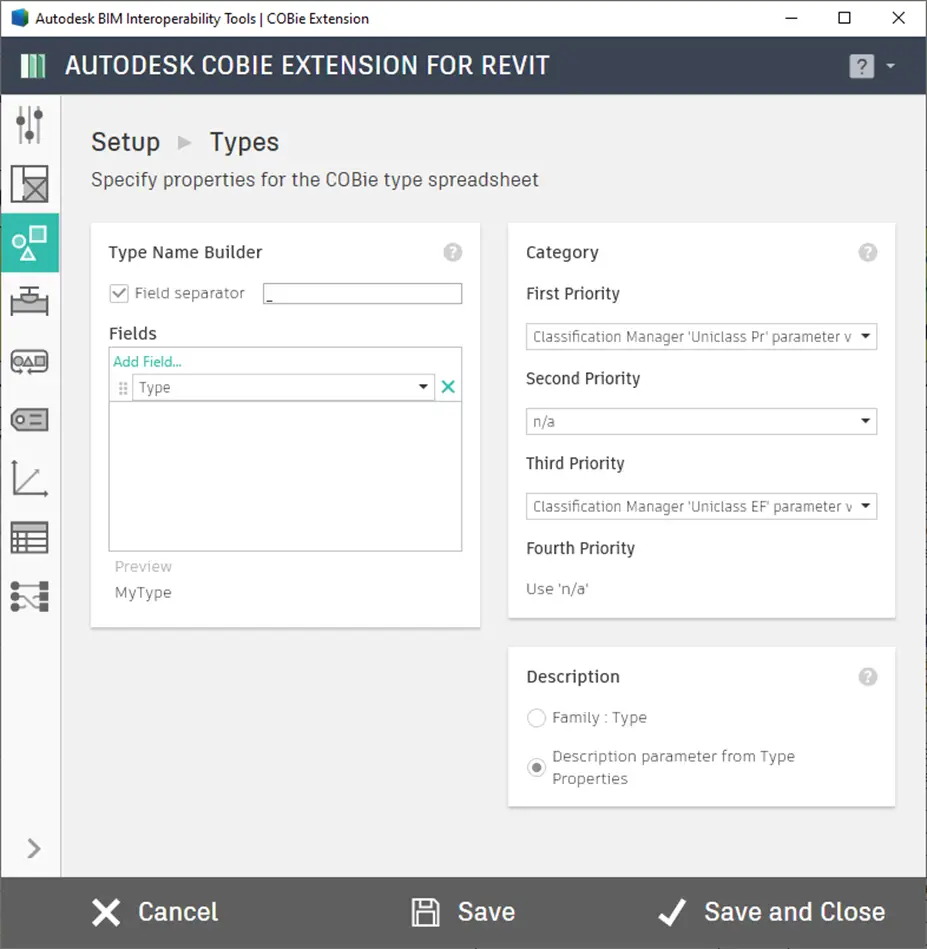
    Setup > Types
    COBie Extension Setup Types page with type name builder and Uniclass Pr and EF category priorities
    Setup Project_Types
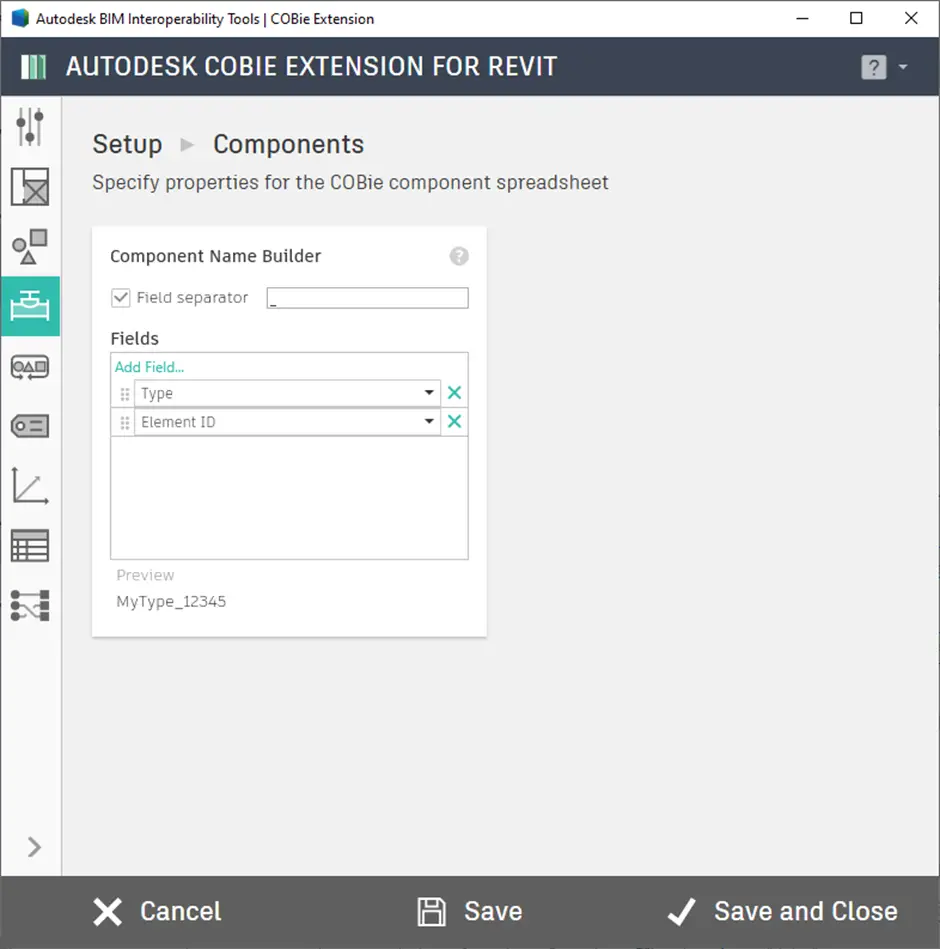
    Setup > Components
    COBie Extension Setup Components page with the component name built from Type and Element ID
    Setup Project_Components
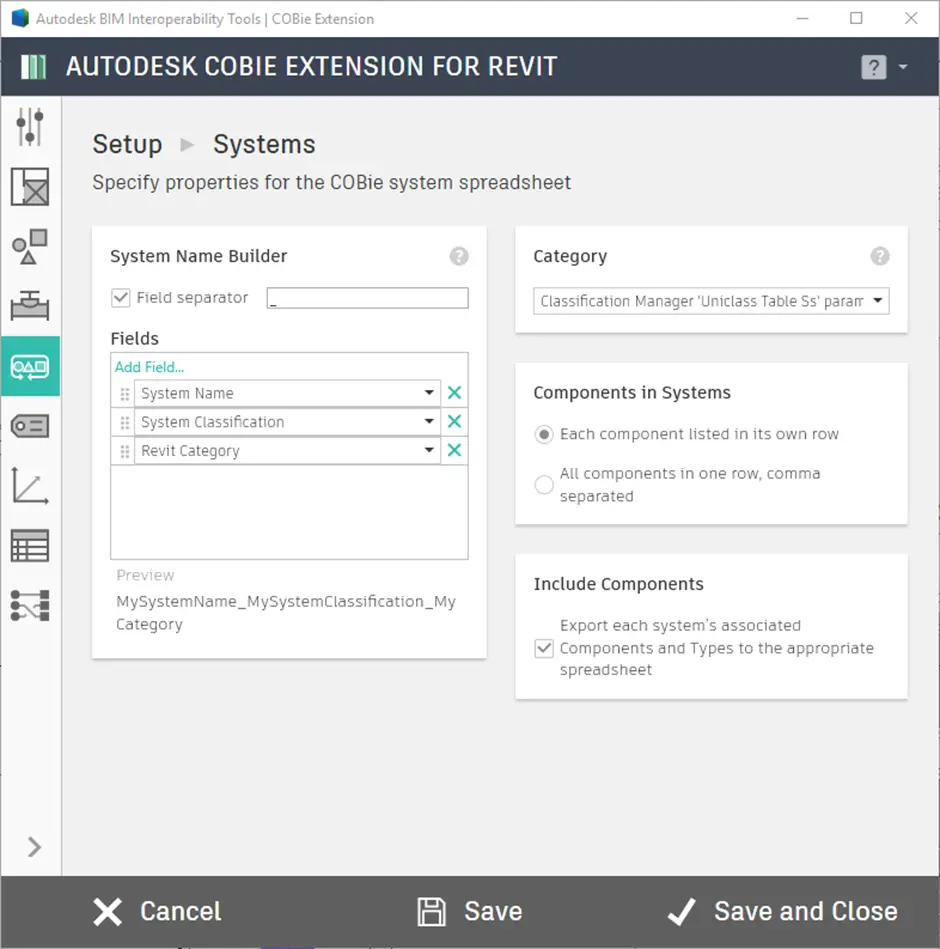
    Setup > Systems
    COBie Extension Setup Systems page with system name fields and the Uniclass Table Ss category
    Setup > Attributes

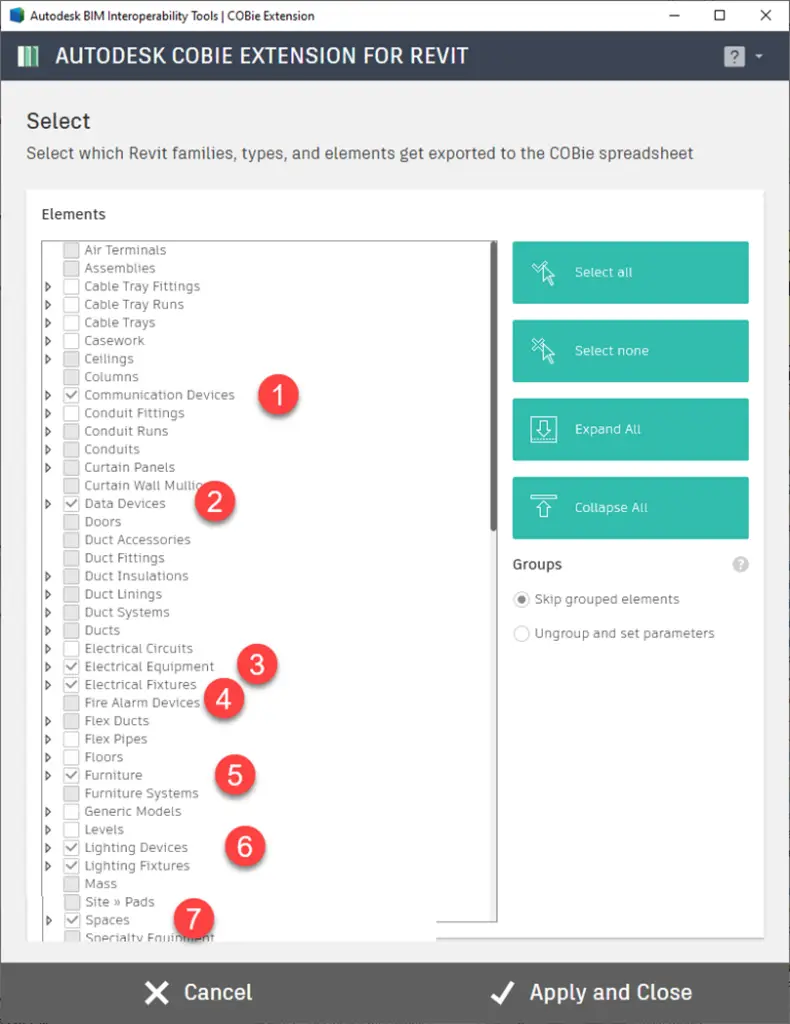
    Although this is very much project specific, typically only the following attributes are required for the export from electrical Project Information Model (PIM) :

    • Communication Devices
    • Data Devices
    • Electrical Equipment
    • Electrical Fixtures
    • Furniture
      • If the Data Rack is classified as Pr_40_30_78_27 Equipment storage racks saved as furniture
    • Lighting Devices
    • Lighting Fixtures

    The below is an example of how to include the additional custom codes, please select/check the custom parameters in each category:

    • Type.NRM1
    • Type.SFG20

    Only one example is shown in the figure below; the process must be applied to all required components.
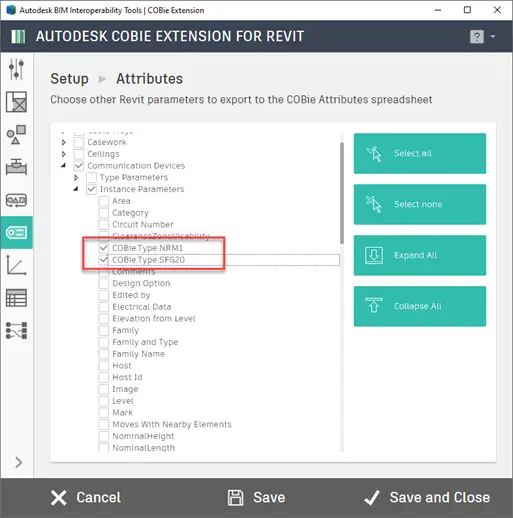
    Autodesk COBie Extension for Revit Setup Attributes screen with COBie.Type.NRM1 and COBie.Type.SFG20 ticked
    BIM Interoperability Tools > Setup Project_Attributes
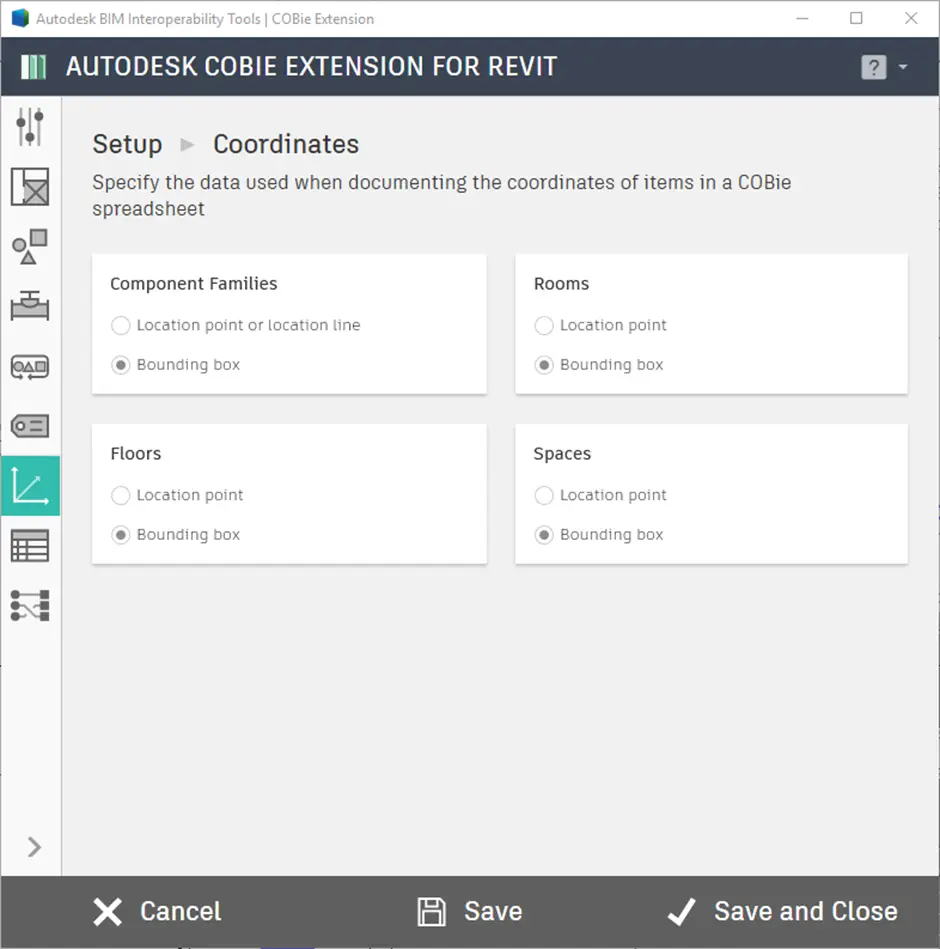
    Setup > Coordinates
    COBie Extension Setup Coordinates page with bounding box chosen for component families, rooms, floors and spaces
    Setup Project_Coordinates
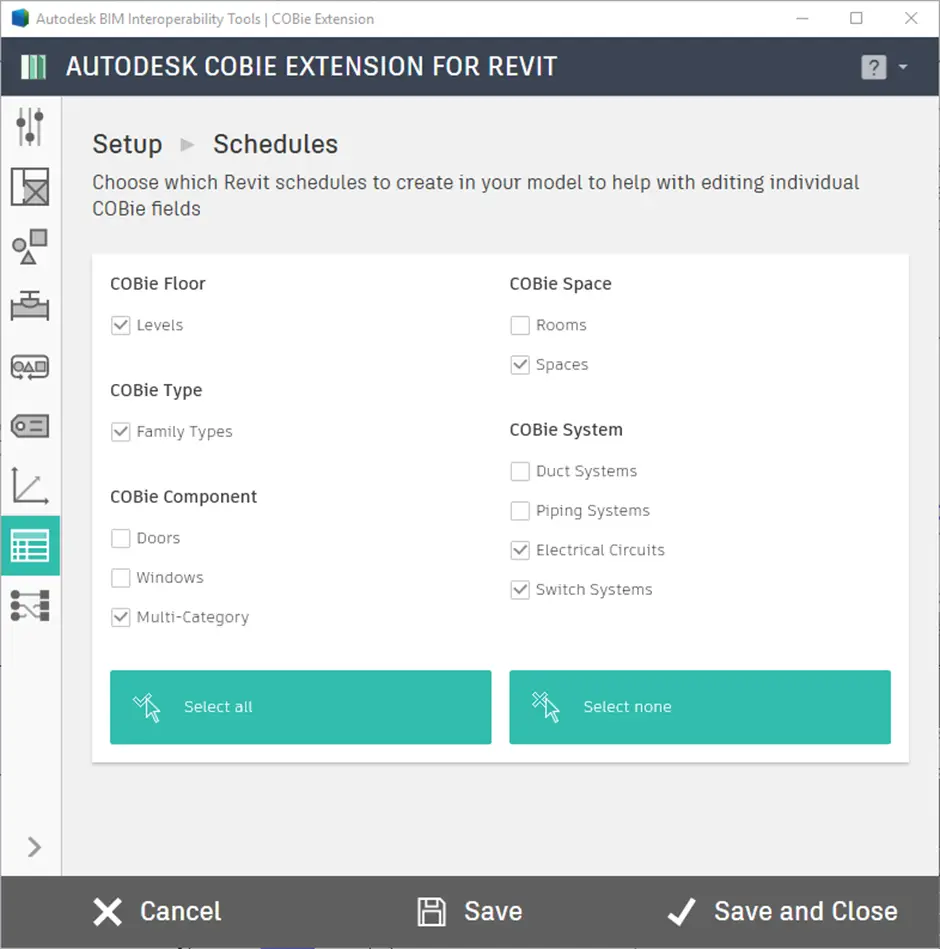
    Setup > Schedules
    COBie Extension Setup Schedules page choosing which COBie schedules Revit creates
    Setup Project_Schedules
    Setup > Parameter Mapping

    You can use parameter mapping to combine multiple parameters, for instance to produce a customised name in a COBie spreadsheet. In the example shown below, the two shared (custom) parameters COBie.Type.NRM1 and COBie.Type.SFG20 are mapped to Component BarCode and TagNumber, respectively.
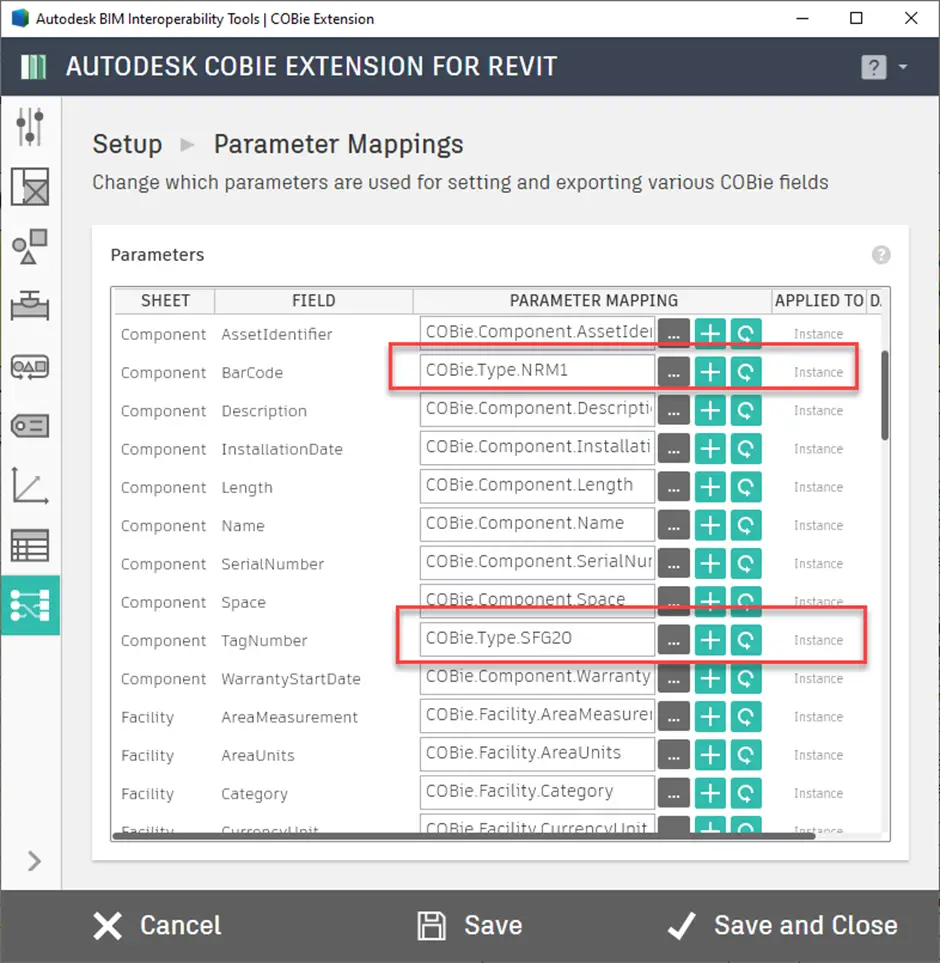
    COBie Extension Parameter Mappings page mapping BarCode to COBie.Type.NRM1 and TagNumber to COBie.Type.SFG20
    COBie Parameter Mapping

    At this point, the data is ready to be exported by the ‘Create Spreadsheet’ selection

    Update Project

    Prior to producing the spreadsheet, you must update your Revit project to populate the parameters based on the project settings.

    Select families, types, and elements for export

    Go to > Select
    Revit COBie Extension ribbon with the Select button highlighted to select elements for COBie export
    BIM Interoperability Tools_Select elements for COBie export

    Now select the items as shown below

    COBie Extension Select dialog with electrical, data, lighting, furniture and space categories ticked for export
    Select elements for COBie export

    click > Apply and Close

    Now you are ready to update all the settings, go to next step

    Update

    go to > Update

    Revit COBie Extension ribbon with the Update button highlighted
    BIM Interoperability Tools Update for COBie export

    For example, select ‘Skip’ all the items that you have already edited at family level and do not want to change, such as Description, on this project the description should match the MAL Description. Any element you leave as ‘All’ will be updated in line with your project settings on all the items you selected in ‘Select’ part of the process
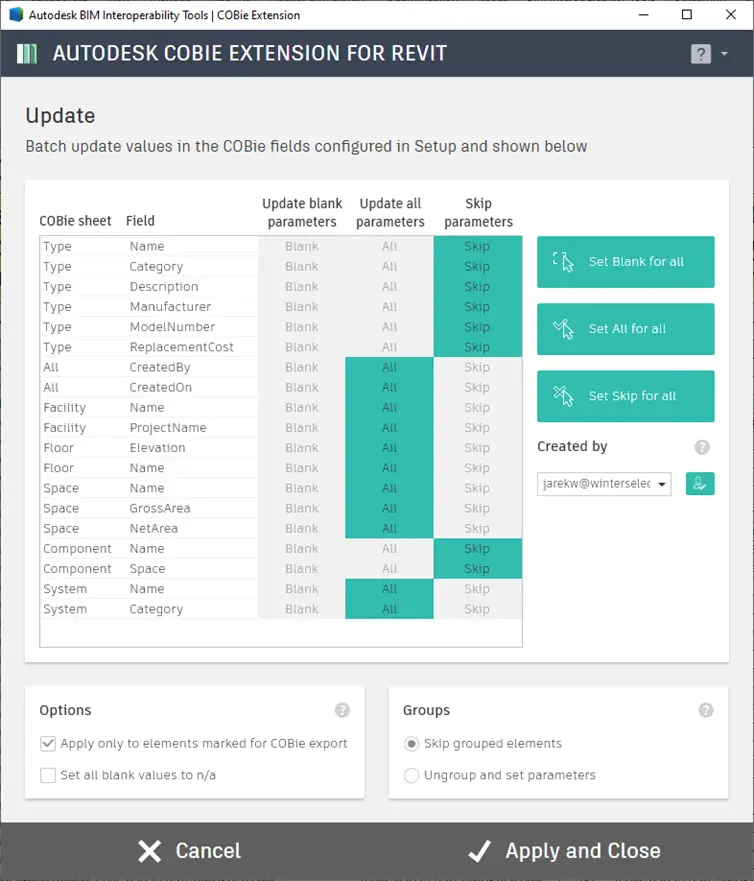
    COBie Extension Update dialog setting blank, all or skip for each COBie sheet field before Apply and Close
    Update COBie in Revit families in project model (PIM)

    Create Spreadsheet

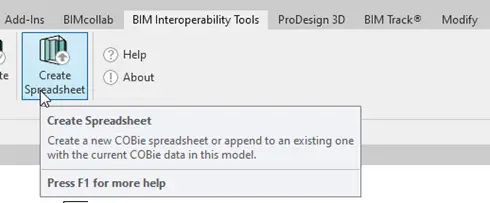
    go to > Create Spreadsheet

    Revit BIM Interoperability Tools ribbon with the Create Spreadsheet button and its tooltip
    BIM Interoperability Tools create a spreadsheet

    Select all items as shown below, make sure you untick the linked models (step 2), browse to your required location and save the file as new.
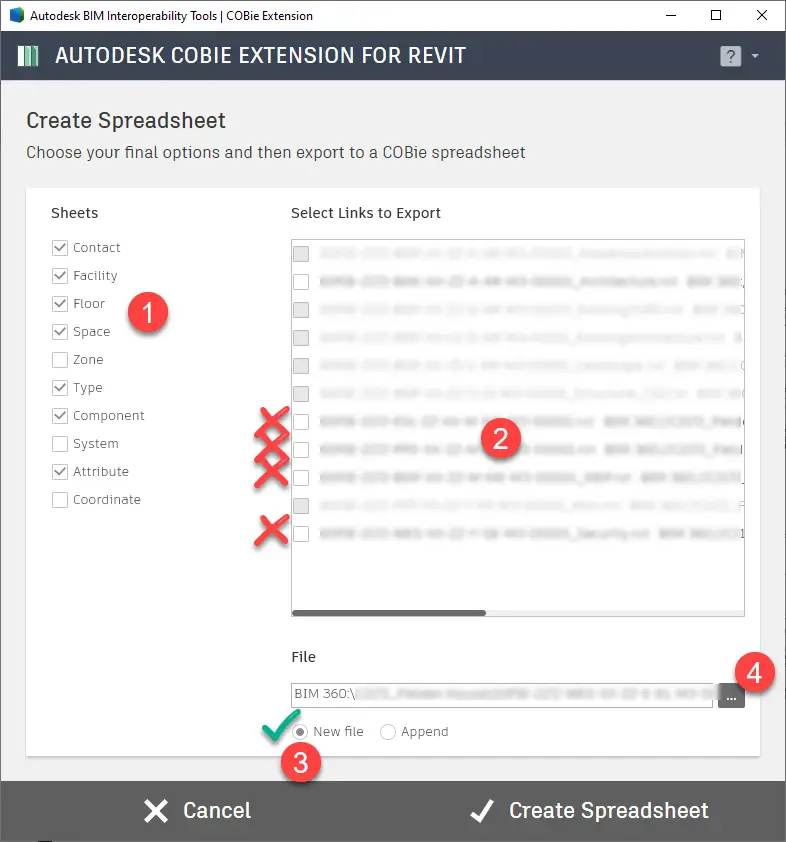

    Autodesk COBie Extension for Revit Create Spreadsheet screen with numbered steps for sheets, links and the output file
    Select Revit linked models
    On This page

      Leave a Reply

      Your email address will not be published. Required fields are marked *

      share this page

      New Arrivals!

      Check out new addition to our Revit family collection!
      New!